> ## Documentation Index
> Fetch the complete documentation index at: https://help.privy.com/llms.txt
> Use this file to discover all available pages before exploring further.
# Use Custom and Smart Segments
> Segment your list to send targeted, engaging content tailored to their unique qualities.
## What is a segment?
A segment is a group of contacts defined by a set of conditions. Unlike a static subscriber list, segments are dynamic, meaning they grow as contacts meet the segment's conditions and shrink as contacts no longer meet them. Segmented email sends often return more revenue per recipient than unsegmented sends since they can be tailored to a particular situation, and thus are more relevant to the recipients.
Privy offers two kinds of segments:
1. Custom Segments
2. Smart Segments
Check out the following guide on how to build, manage, and use your segments in Privy.
## Custom Segments
Custom Segments are built from scratch by you! You can customize a group of your subscribers by combining a number of filters and criteria such as Shopping Activity, Email Engagement, Website Activity, and Customer Attributes.
### Create a new segment
To create a new segment:
* Head to [Contacts > Segments](https://dashboard.privy.com/segments) in your dashboard.
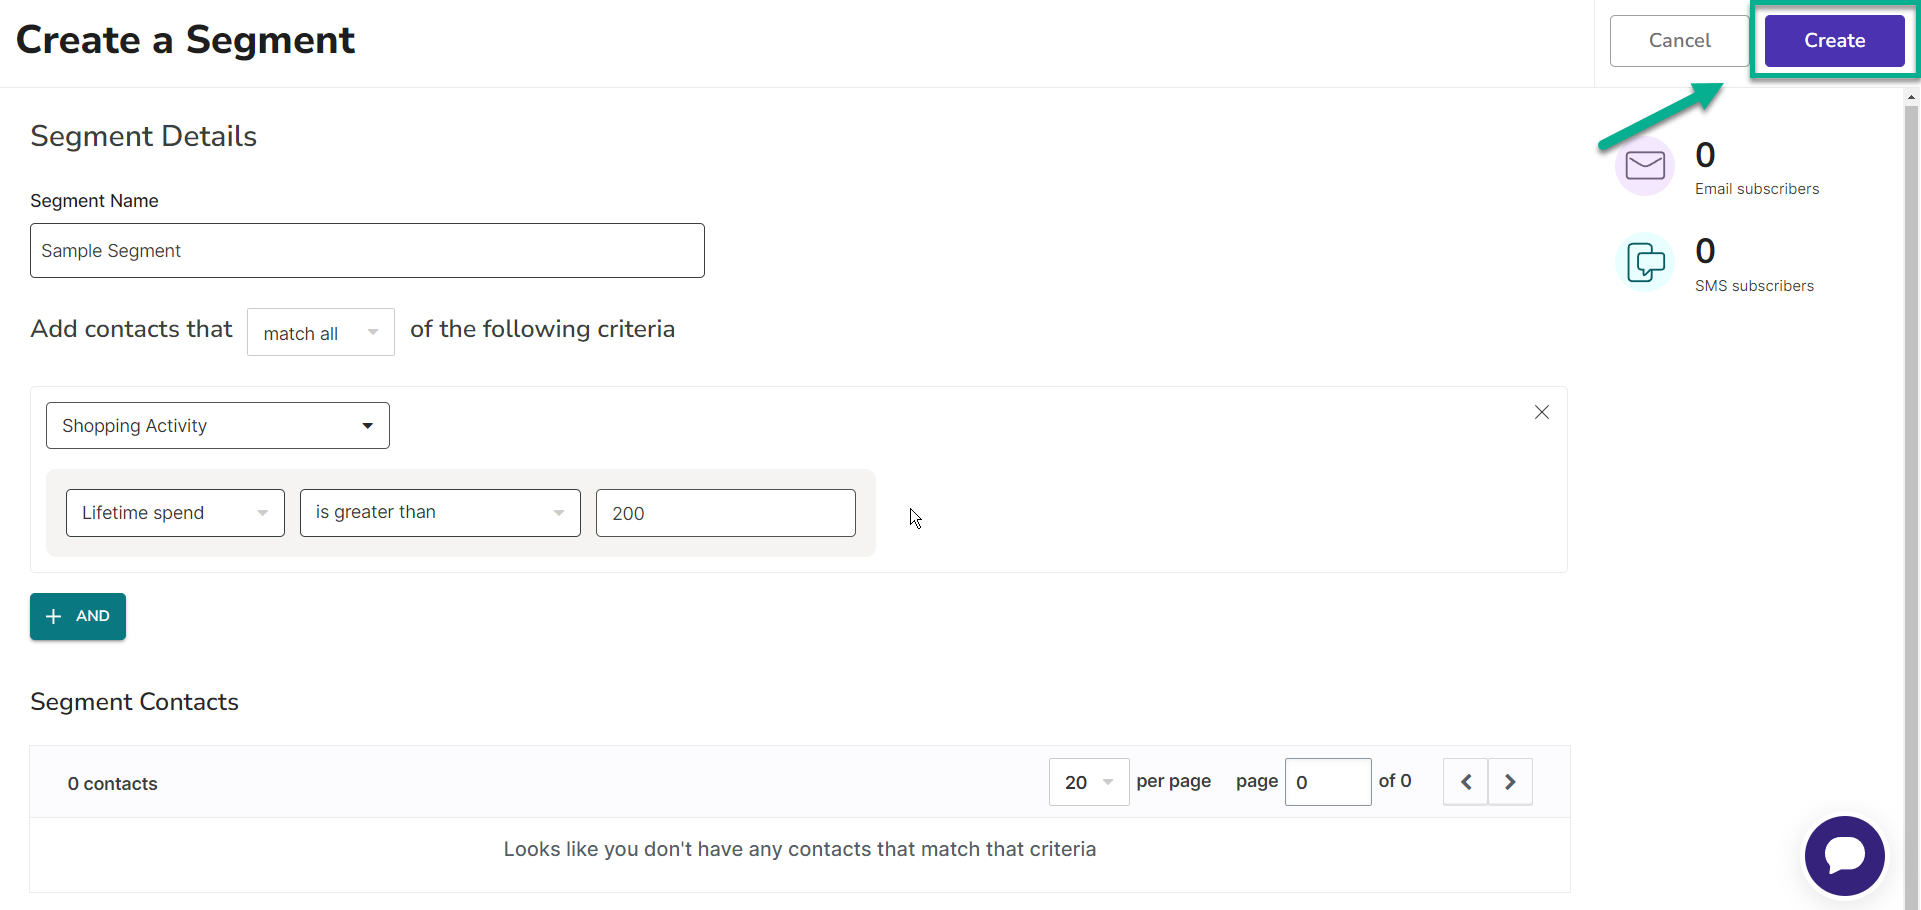
* Click **Create Segment** in the upper right to access the segment builder.
Now you're ready to build your segment:
* Name your segment. This is internal only — your contacts will not see this name.
* Select whether you want your contacts to **Match all** criteria or **Match any** criteria.
* Click the **Choose Category** menu to start selecting your conditions for your segment.
* To add more conditions, select the **+ And** or the **+ Or** buttons to start selecting the next condition.
* The contact count will adjust as you add filter(s). Once you're happy with your segment, click **Create.**
 ### Segment Conditions
Privy offers a number of different conditions to segment your audience by. See below to dive into each category and their conditions.
**Shopping Activity**
Include contacts based on the current value of your BigCommerce, Shopify, Squarespace, or Weebly cart.
Include contacts based on when they first ordered from your store. Target a fixed date (**before**, **after**, **on**) or a rolling window (**in the last** N days).
Include contacts based on when they last ordered from your store. Target a fixed date (**before**, **after**, **on**) or a rolling window (**in the last** N days) — useful for re-engagement or winback audiences.
Include contacts based on their total spending in your Shopify store.
Include contacts based on the number of orders they have placed in your Shopify or Weebly store.
Include contacts based on the products or [collections](https://www.privy.com/blog/introducing-shopify-collections-for-privy) they have purchased or have not purchased from your Shopify store in the past 365 days.
**Website Behavior**
Include contacts based on which displays they have or have not signed up for.
Include contacts based on the last time they visited your site. Target a fixed date (**before**, **after**, **on**) or a rolling window (**in the last** N days).
Include contacts based on when they signed up for your email list / when their contact profile was created.
**Customer Attributes**
Include contacts based on the country reported by the contact's IP address.
Include contacts based on their Custom Field values. These values can be provided via a contact import, or when a contact signs up for a display.
[View this article](https://help.privy.com/docs/guides/list-growth/mini-quiz-strategy#using-your-mini-quiz-data) for an example of building a segment using Custom Fields.
Include contacts based on whether or not they have been manually imported directly from another service or via CSV.
Include contacts based on their exact name or email address.
Include or exclude contacts based on the [tags](https://help.privy.com/docs/learn/contact-management/tag-contacts) applied to their contact profile.
Include or exclude contacts based on the [tags](https://help.shopify.com/en/manual/shopify-admin/productivity-tools/using-tags#tag-types) applied to their customer profile in Shopify.
**Email Engagement**
Include contacts that opened a specific campaign, or opened any campaign within a specific window of time.
Include contacts that did not open a specific campaign, or did not open on any campaign within a specific window of time.
Include contacts that clicked a specific campaign, or clicked on any campaign within a specific window of time.
Include contacts that did not click on a specific campaign, or did not click on any campaign within a specific window of time.
Include contacts that were sent a specific campaign, or were sent any campaign within a specific window of time.
Include contacts that were not a specific campaign, or were not sent any campaign within a specific window of time.
**SMS Engagement**
SMS campaign engagement options mirror **Email Engagement**: you can target contacts who were sent (or not sent) a specific SMS campaign, or who clicked (or did not click) links in those messages, within the time windows you choose.
Include contacts that were sent a specific SMS campaign, or were sent any SMS campaign within a specific window of time.
Include contacts that were not sent a specific SMS campaign, or were not sent any SMS campaign within a specific window of time.
Include contacts that clicked a link in a specific SMS campaign, or clicked on any SMS campaign within a specific window of time.
Include contacts that did not click on a specific SMS campaign, or did not click on any SMS campaign within a specific window of time.
### Managing Custom Segments
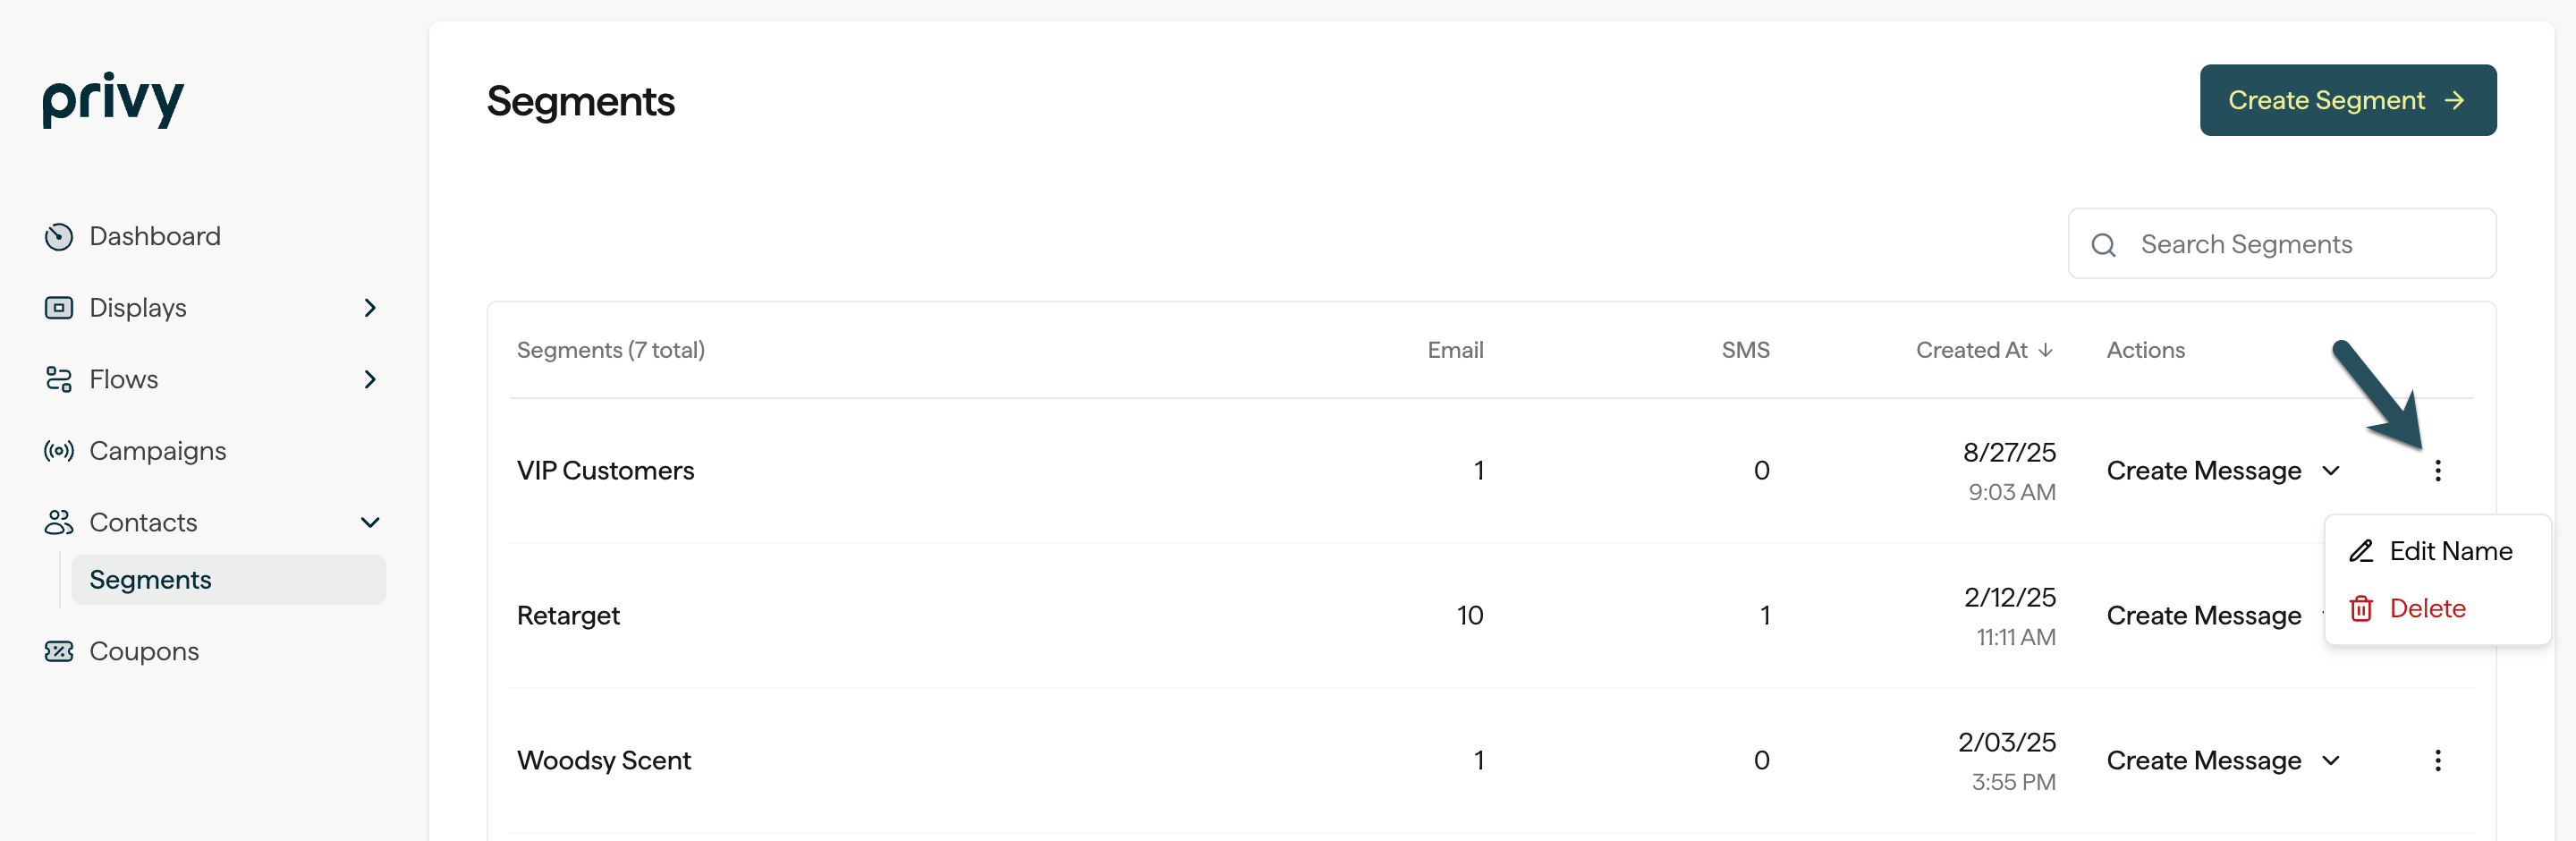
To manage an existing Custom Segment, head to [Contacts > Segments](https://dashboard.privy.com/segments). Locate your desired segment and click on the menu beside it. Select **Edit Name** or **Delete**.
### Segment Conditions
Privy offers a number of different conditions to segment your audience by. See below to dive into each category and their conditions.
**Shopping Activity**
Include contacts based on the current value of your BigCommerce, Shopify, Squarespace, or Weebly cart.
Include contacts based on when they first ordered from your store. Target a fixed date (**before**, **after**, **on**) or a rolling window (**in the last** N days).
Include contacts based on when they last ordered from your store. Target a fixed date (**before**, **after**, **on**) or a rolling window (**in the last** N days) — useful for re-engagement or winback audiences.
Include contacts based on their total spending in your Shopify store.
Include contacts based on the number of orders they have placed in your Shopify or Weebly store.
Include contacts based on the products or [collections](https://www.privy.com/blog/introducing-shopify-collections-for-privy) they have purchased or have not purchased from your Shopify store in the past 365 days.
**Website Behavior**
Include contacts based on which displays they have or have not signed up for.
Include contacts based on the last time they visited your site. Target a fixed date (**before**, **after**, **on**) or a rolling window (**in the last** N days).
Include contacts based on when they signed up for your email list / when their contact profile was created.
**Customer Attributes**
Include contacts based on the country reported by the contact's IP address.
Include contacts based on their Custom Field values. These values can be provided via a contact import, or when a contact signs up for a display.
[View this article](https://help.privy.com/docs/guides/list-growth/mini-quiz-strategy#using-your-mini-quiz-data) for an example of building a segment using Custom Fields.
Include contacts based on whether or not they have been manually imported directly from another service or via CSV.
Include contacts based on their exact name or email address.
Include or exclude contacts based on the [tags](https://help.privy.com/docs/learn/contact-management/tag-contacts) applied to their contact profile.
Include or exclude contacts based on the [tags](https://help.shopify.com/en/manual/shopify-admin/productivity-tools/using-tags#tag-types) applied to their customer profile in Shopify.
**Email Engagement**
Include contacts that opened a specific campaign, or opened any campaign within a specific window of time.
Include contacts that did not open a specific campaign, or did not open on any campaign within a specific window of time.
Include contacts that clicked a specific campaign, or clicked on any campaign within a specific window of time.
Include contacts that did not click on a specific campaign, or did not click on any campaign within a specific window of time.
Include contacts that were sent a specific campaign, or were sent any campaign within a specific window of time.
Include contacts that were not a specific campaign, or were not sent any campaign within a specific window of time.
**SMS Engagement**
SMS campaign engagement options mirror **Email Engagement**: you can target contacts who were sent (or not sent) a specific SMS campaign, or who clicked (or did not click) links in those messages, within the time windows you choose.
Include contacts that were sent a specific SMS campaign, or were sent any SMS campaign within a specific window of time.
Include contacts that were not sent a specific SMS campaign, or were not sent any SMS campaign within a specific window of time.
Include contacts that clicked a link in a specific SMS campaign, or clicked on any SMS campaign within a specific window of time.
Include contacts that did not click on a specific SMS campaign, or did not click on any SMS campaign within a specific window of time.
### Managing Custom Segments
To manage an existing Custom Segment, head to [Contacts > Segments](https://dashboard.privy.com/segments). Locate your desired segment and click on the menu beside it. Select **Edit Name** or **Delete**.
 As of now, there is no way to edit the conditions of an existing segment in Privy once it's been created.
### Export a Custom Segment to CSV
To download the contacts in a saved Custom Segment as a CSV:
1. Head to [Contacts > Segments](https://dashboard.privy.com/segments).
2. Open the actions menu on the segment's row and select **Export CSV**.
3. The CSV is generated in the background, emailed to the address on your Privy account, and listed under [Contacts > Exports](https://dashboard.privy.com/contacts/exports) with the segment name in the description.
Export CSV is only available on saved Custom Segments. Prebuilt Smart Segments don't expose this action.
## Smart Segments
Smart Segments are prebuilt by Privy. They allow you to quickly target a group of your contacts without the hassle of creating a custom segment. Below are the four kinds of Smart Segments in Privy:
Mailable contacts who have opened or clicked at least one email within the last 90 days. This segment also includes new contacts who joined your list within the last 90 days.
Mailable contacts who have not opened or clicked any email within the last 90 days. This segment excludes any new contacts who joined your list within the last 90 days.
Mailable contacts who have never placed an order with your store.
Mailable contacts who have placed at least one order with your store.
There's currently no way to edit or delete Privy Smart Segments.
## Using your segments
You can use your segments to target both email and text messages in Privy.
### Create a new message from your Segments page
1. Navigate to [Contacts > Segments](https://dashboard.privy.com/segments). Locate the Custom or Smart Segment you'd like to use.
2. Select the **Create message** dropdown under the *Actions* column on your Segments table. Choose from Email or SMS.
Proceed with the usual steps of creating an email or SMS campaign. Your new message will already be segmented based on your selection from the Segments page!
### Edit an existing email's recipients
If you already have an email campaign draft that you'd like to segment:
1. Head to [Campaigns](https://dashboard.privy.com/message-campaigns) and select the desired draft.
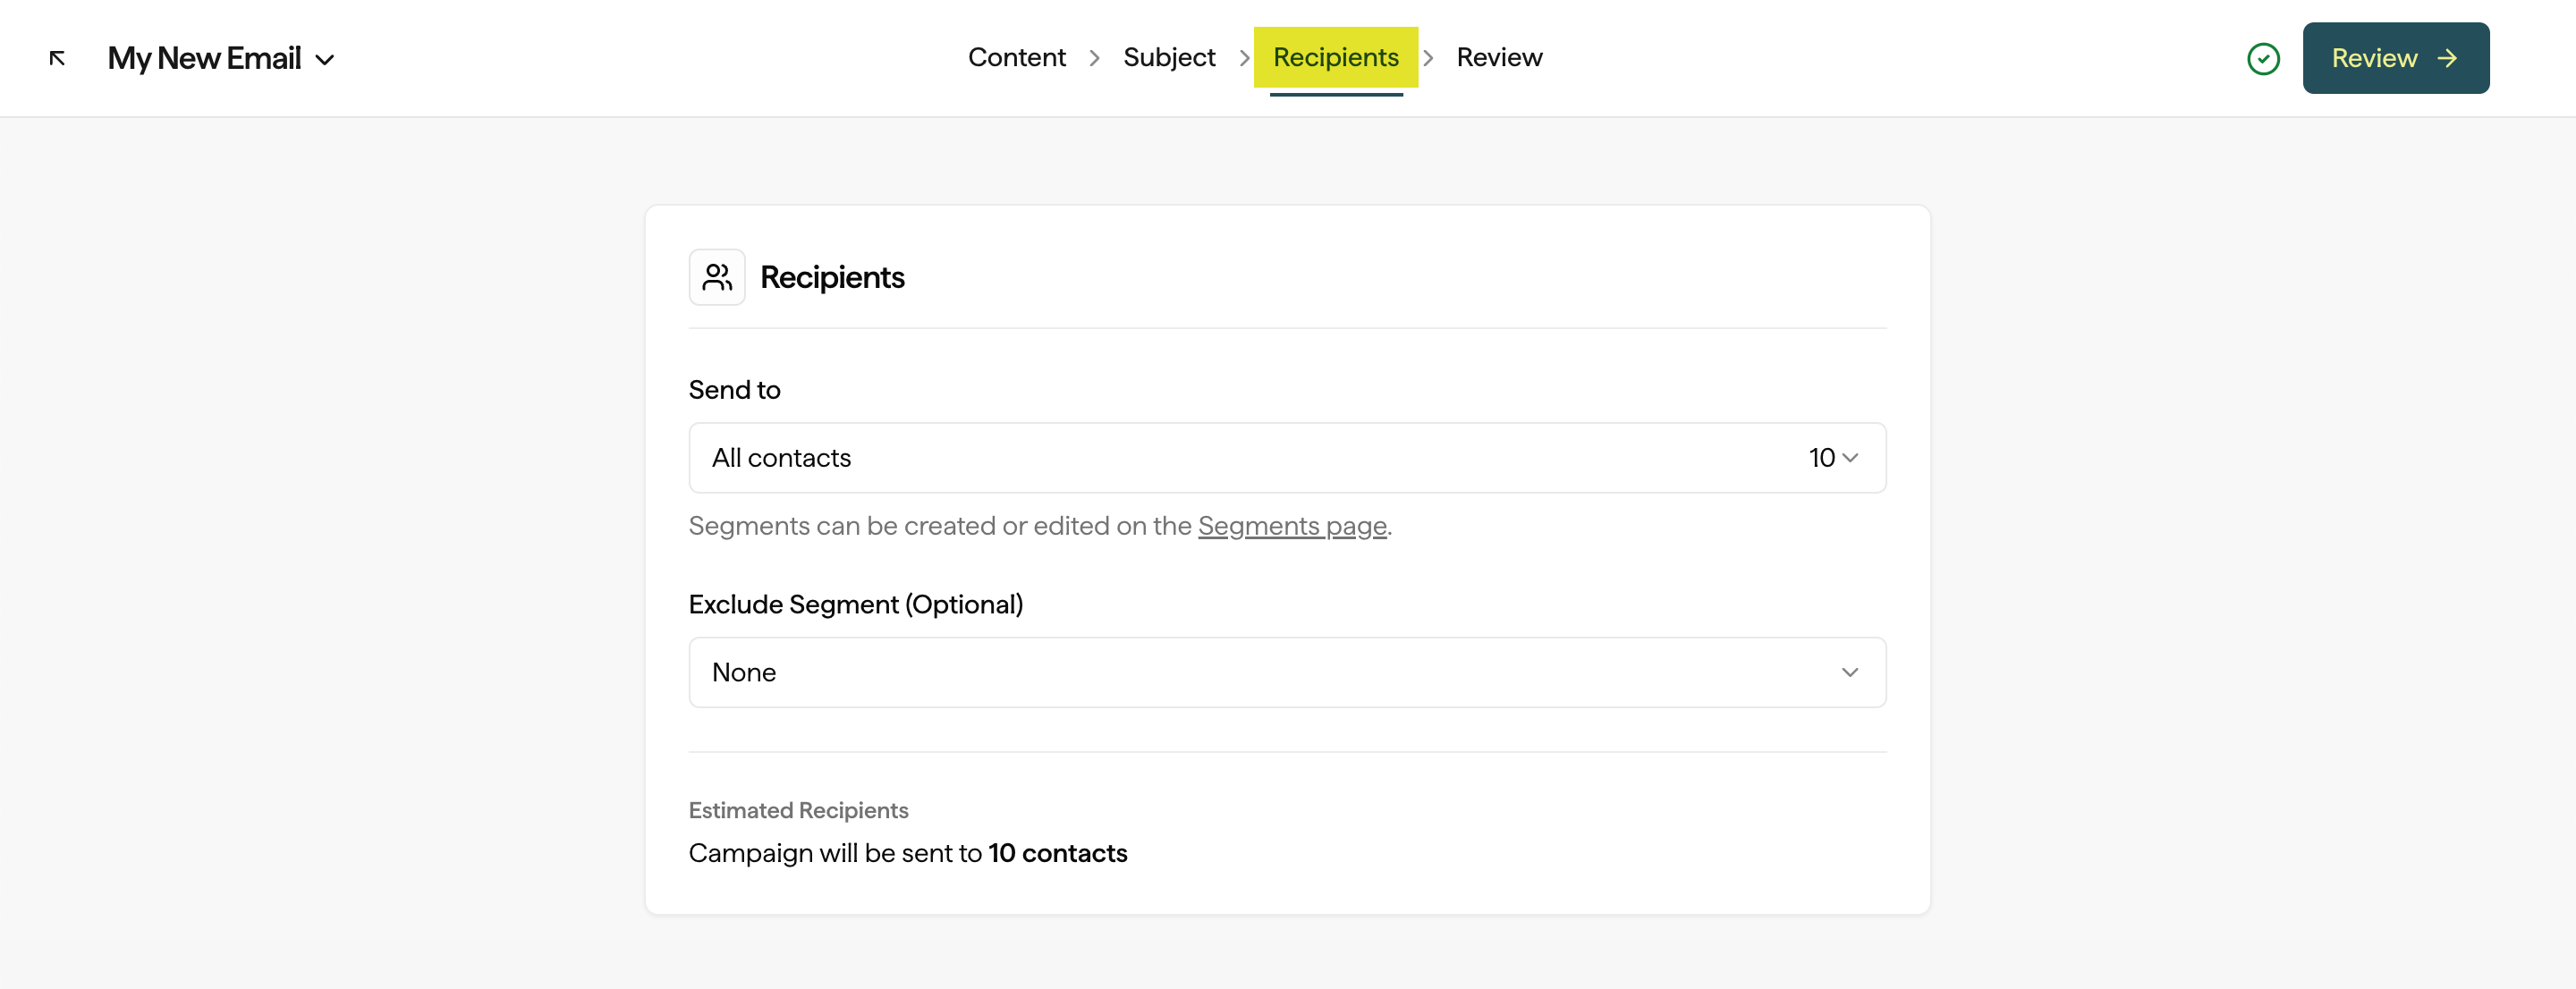
2. Head to the **Recipients** step at the top of your email builder.
3. Specify which Custom or Smart Segment you'd like to send to.
4. *Optional:* Specify if there is a segment you'd like to exclude under the "Don't Send To" section.
As of now, there is no way to edit the conditions of an existing segment in Privy once it's been created.
### Export a Custom Segment to CSV
To download the contacts in a saved Custom Segment as a CSV:
1. Head to [Contacts > Segments](https://dashboard.privy.com/segments).
2. Open the actions menu on the segment's row and select **Export CSV**.
3. The CSV is generated in the background, emailed to the address on your Privy account, and listed under [Contacts > Exports](https://dashboard.privy.com/contacts/exports) with the segment name in the description.
Export CSV is only available on saved Custom Segments. Prebuilt Smart Segments don't expose this action.
## Smart Segments
Smart Segments are prebuilt by Privy. They allow you to quickly target a group of your contacts without the hassle of creating a custom segment. Below are the four kinds of Smart Segments in Privy:
Mailable contacts who have opened or clicked at least one email within the last 90 days. This segment also includes new contacts who joined your list within the last 90 days.
Mailable contacts who have not opened or clicked any email within the last 90 days. This segment excludes any new contacts who joined your list within the last 90 days.
Mailable contacts who have never placed an order with your store.
Mailable contacts who have placed at least one order with your store.
There's currently no way to edit or delete Privy Smart Segments.
## Using your segments
You can use your segments to target both email and text messages in Privy.
### Create a new message from your Segments page
1. Navigate to [Contacts > Segments](https://dashboard.privy.com/segments). Locate the Custom or Smart Segment you'd like to use.
2. Select the **Create message** dropdown under the *Actions* column on your Segments table. Choose from Email or SMS.
Proceed with the usual steps of creating an email or SMS campaign. Your new message will already be segmented based on your selection from the Segments page!
### Edit an existing email's recipients
If you already have an email campaign draft that you'd like to segment:
1. Head to [Campaigns](https://dashboard.privy.com/message-campaigns) and select the desired draft.
2. Head to the **Recipients** step at the top of your email builder.
3. Specify which Custom or Smart Segment you'd like to send to.
4. *Optional:* Specify if there is a segment you'd like to exclude under the "Don't Send To" section.
 ### Edit an existing text's recipients
1. Head to [Campaigns](https://dashboard.privy.com/message-campaigns) and select the desired draft.
2. Scroll below your Text Message content to edit your message's *Recipients*.
3. Specify which Custom or Smart Segment you'd like to send to.
4. *Optional:* Specify if there is a segment you'd like to exclude under the "Don't Send To" section.
### Target a Segment in a Split Flow
To target messages towards specific segments in your automated Flows:
* Navigate to your Flows from your dashboard.
* Create a new Flow, or choose an existing one.
* [Create a new Split Flow](https://help.privy.com/docs/learn/flows/split-flow#add-a-split-flow).
* Select your Split Flow block and Add a Condition from the settings on the right.
* Select **Segment** from the dropdown menu.
* Choose which Segment(s) you'd like to target.
### Edit an existing text's recipients
1. Head to [Campaigns](https://dashboard.privy.com/message-campaigns) and select the desired draft.
2. Scroll below your Text Message content to edit your message's *Recipients*.
3. Specify which Custom or Smart Segment you'd like to send to.
4. *Optional:* Specify if there is a segment you'd like to exclude under the "Don't Send To" section.
### Target a Segment in a Split Flow
To target messages towards specific segments in your automated Flows:
* Navigate to your Flows from your dashboard.
* Create a new Flow, or choose an existing one.
* [Create a new Split Flow](https://help.privy.com/docs/learn/flows/split-flow#add-a-split-flow).
* Select your Split Flow block and Add a Condition from the settings on the right.
* Select **Segment** from the dropdown menu.
* Choose which Segment(s) you'd like to target.